Chapter 5 - Controlling Puppet Configuration With Git
The power and flexibility of our setup is starting to become apparent. We’re now able to provision servers automatically, and have them configure themselves based on their role and environment. And the whole thing is managed from a bunch of configuration files on our puppet master.
So. The next logical step is to stop logging in to the puppet master and editing all these files by hand. Some form of remote management would be really nice, and more importantly, the ability to track any changes and easily identify problems if something goes wrong!
To address this need for version control, we’ll start using Git to manage Puppet’s configuration. To make things easier, we can use an Integrated Development Environment (IDE) to make and commit changes.
The Geppetto IDE
Since we’ll be writing Puppet code, we’ll use an IDE which is designed specifically for the purpose called Geppetto. This can either be installed as an add-on for Eclipse (handy if you’re already using Eclipse for other development projects), or you can download a standalone version which includes all the necessary Eclipse functionality. We’ll set up our git repository first, then configure Geppetto to interact with it.
The Git Repository and Gitolite
Rather than relying on an external service such as GitHub to host the repository, we’ll use an internal service running on a dedicated code repository. Access to these git repositories will be controlled by gitolite.
The Repository Host
This will be a CentOS 6.4 virtual machine with the distro’s git package installed.
Server name: coderepo.puppetlunch.com
To provision the machine, we create a new A record in DNS then use the ‘hatch’ auto-provisioning script to give us a standard build with the role ‘gitrepo’.
# hatch -h coderepo.puppetlunch.com -r gitrepoOnce the machine is up and running, we migrate it to a suitable back- end data store and move it into the ‘Live’ folder in vSphere. The entire process takes about 10 mins.
Installing gitolite
The ‘gitrepo’ server role includes a class called ‘pl_gitolite’. The pl_gitolite module ensures that the git package is installed, and installs gitolite if it’s not already there.
A typical gitolite installation procedure would follow these steps:
- Create the ‘gitolite’ system user
- Use git to install (clone) gitolite from GitHub
- Create the gitolite user’s ~/bin directory
- Run the gitolite installer
- Create a directory for public keys
- Copy the administrator public key from the puppet master
- Run gitolite setup using this public key
Configuring gitolite
Gitolite is administered via its own git repository (a nice touch), so we can use Geppetto to grab a copy of the repo before making changes. But before we can do that, we need to set up some SSH keys…
Authentication - SSH Keys
Giltolite security relies on the use of ssh and public/private key pairs. The keys for each user are stored in the gitolite user’s .ssh/authorized_keys file. For example, this is the entry for the ‘bob’ user:
command="/opt/gitolitehome/gitolite/src/gitolite-shell bob",no-port-forwarding,no-X11-forwarding,no-agent-forwarding,no-pty ssh-rsa AAAAB3NzaC1yc2EAAAADAQABAAAAgQCLLy3m+NKPk+ks9vBkPaJ5rDjvbgpu70CTaQjEm6iGBxuaNUOTzP1P J5IerNjFIKd56wijTecza6SZWRMEo5ieYEfk8dVWNRLPZxEjGYMNm0sIgZ8HYxv8Oj6qX0yEfvufhPYjDIMq 7e9yo9Beb9fKScHefYkyw8O8LbpNLxPouQ== RSA-1024So gitolite relies on ssh to authenticate any user logging in with the appropriate key. If the public key isn’t in this file, no access can be granted.
More info on how gitolite uses ssh can be found here.
Authorization - the gitolite Config File
Authorization is controlled via a configuration file (gitolite.conf), but this shouldn’t be updated directly on the server. Instead, the admin user (used to set up gitolite initially) must clone the ‘gitolite- admin’ repository via gitolite itself.
Cloning the gitolite-admin Repository
This is the procedure for Eclipse / Geppetto:
- File -> Import -> Git -> Projects from Git
- URI: gitolite@coderepo.puppetlunch.com:gitolite-admin
- Host: coderepo.puppetlunch.com
- Repository path: gitolite-admin
- Connection protocol: ssh
- User gitolite
You then import this as a new general project. Provided the ssh keys are set up correctly, this should Just Work.
Note: When using Geppetto, it’s important to ensure that any new text files are saved in Unix (line feed) format. This can be configured in user preferences:
- Window -> Preferences -> General -> Workspace -> New text file line delimiter -> ‘Other: Unix’
Making Changes
Any changes made using the IDE can be committed locally, then pushed up to the gitolite server. Configuration changes should take effect immediately. You can verify that a change has been made successfully by looking in ~gitolite/.gitolite/gitolite.conf.
Bringing it All Together
So we have a Git repository and have managed to talk to it using our IDE, but there are many different options for managing Puppet configuration, and the task is complicated further by the existence of 3rd party modules from the Puppet Forge.
So here’s the module management plan…
- Use r10k for deploying modules from the Puppet Forge
- Only keep locally-developed modules in the Git repository
- Tell r10k where to find everything using a ‘Puppetfile’
We’ll also configure Puppet for Dynamic Environments. This feature simply duplicates everything we’ve done so far on a per-environment basis. It complicates the overall configuration of the Puppet Master itself, but crucially it shouldn’t add complexity to a particular environment.
A discussion and development of this idea can be found in Appendix B - Dynamic Environments. The appendix also details our configuration choices and git repository structure, so it’s strongly recommended to read this before continuing.
Geppetto - Repository and Workspace Setup
Now that we’ve decided everything should live in a Git repository, we need to import the existing Puppet configuration.
Creating the repository only needs to be done once. If you just want to set up Geppetto to use an existing repository, see Geppetto Installation and Setup.
Create a New Git Repository from Existing Puppet Config
Archive the current configuration. Create new Git repo in gitolite called “puppetmaster_np”. Configure access to the repo for ‘puppetmaster’ in gitolite. Clone this empty repo to your local workstation using Geppetto. Import the archived Puppet configuration files. Commit and push.
Install and Configure r10k on the Puppet Master
What is r10k?
r10k is an automated deployment tool for puppet configuration files. It pulls the contents of a specified git repository and places them in a specified directory on the puppetmaster. It’s also aware of the concept of dynamic environments, and will assume that any existing branches in the repository correspond to puppet environments and should therefore be deployed as well.
Its other main feature is the ability to deploy Puppet Forge modules. If it finds a file called ‘Puppetfile’ it will parse this for module names and versions, then install the specified modules.
Installation
We install r10k like this:
# /opt/puppet/bin/gem install r10kThis installs the r10k Ruby script in /opt/puppet/bin/r10k, so to run it from the command line as just ‘r10k’, we can either create a shell alias or set up a symlink from /usr/local/bin. We opted for the alias in root’s .bashrc. Once set up, it’s unlikely you’ll need to run it manually unless some form of approval process is introduced, in which case the reviewer would trigger the deployment.
Configuration
Configuration is done via a YAML configuration file:
File: /etc/r10k.yaml

# The location to use for storing cached Git repos
cachedir: '/var/cache/r10k'
# A list of git repositories to create
sources:
  # This will clone the git repository and instantiate an environment per
  # branch in /etc/puppetlabs/puppet/environments
  puppetmaster_np:
    remote: 'ssh://gitolite@coderepo.puppetlunch.com/puppetmaster_np'
    basedir: '/etc/puppetlabs/puppet/environments'
When communicating with the git server via ssh, r10k uses the current user’s public key for authentication. We’ve configured gitolite to recognise the pe-puppet user’s public key on the puppet master as the gitolite user ‘pe-puppet’.
We run r10k as this user, and ensure the correct directory permissions are set on the /etc/puppetlabs/puppet/environments directory so that r10k can modify the content.
Deploy
We then make the necessary changes to the puppet configuration, hiera configuration and restructure the puppet configuration directory as discussed in Dynamic Environments, then run this:
r10k deploy environmentIt deploys all branches of the repository into the /etc/puppetlabs/puppet/environments directory as individual environments.
Puppet Modules
r10k can also run off and get Puppet Forge modules. As previously stated, we use a ‘Puppetfile’ to tell it which modules to get, and which versions. This is why the git repository contains a Puppetfile and an empty directory called ‘modules’. The contents of this directory are managed by r10k on the puppetmaster itself.
! Note that the ‘modules’ directory is managed by r10k, which will remove all files not belonging to the modules specified in Puppetfile. Please leave this directory empty.
More information r10k and the Puppetfile can be found here.
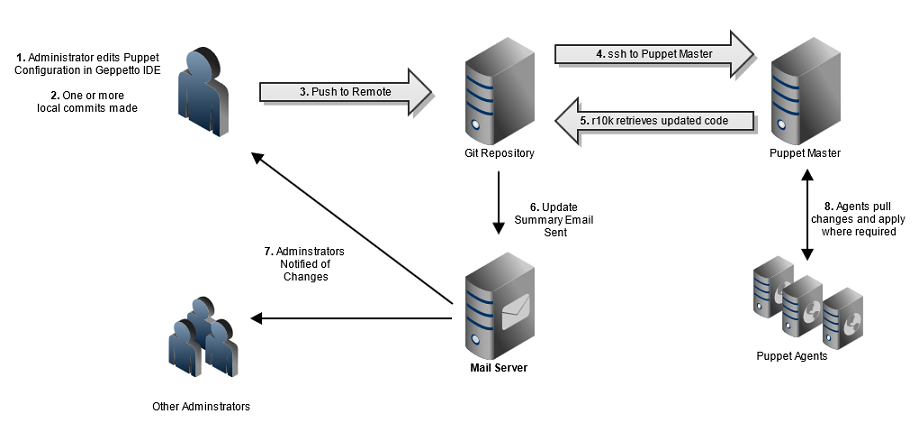
Workflow Diagram