Appendix C - Node Classification: Roles & Profiles
So we now have many small single-purpose modules in our puppet configuration, and the number is growing by the day. It’s easy to see that this could become difficult to manage. For instance, it’s not easy to determine which modules are required for a specific application platform, and we may find ourselves having to pick and choose modules every time a new host or environment is required. It would therefore be useful have a strategy for preserving long-term manageability. Fortunately, the flexibility of Puppet allows us to address this without having to add extra functionality or software.
Platform Building Blocks
There’s a growing trend in the Puppet community towards abstracting the organisation of Puppet modules into more meaningful groups. These groups are called ‘Roles’ and ‘Profiles’. Together with ‘Modules’ these make up the building blocks of our application platforms. This is how they’re related…
Puppet Modules
A module is usually designed to manage one software component. For example, a ‘tomcat’ module may install tomcat and create the directory structure for individual instances.
Modules can be extremely simple and only be responsible for managing one software package. Here’s an example for the git package:
[root@puppetmaster-np ~]# cd /etc/puppetlabs/puppet/environments/production/local_modules

[root@puppetmaster-np local_modules]# tree pl_git
pl_git
  manifests
    init.pp

1 directory, 1 file

[root@puppetmaster-np local_modules]# cat pl_git/manifests/init.pp
#
# = Class: pl_git
#
# Ensures the git RPM package is installed.
#
class pl_git {
  package { 'git':
    ensure => present,
  }
}
An example of a more complicated module prepares the pl_webapp1 application container. Here’s the directory tree:
[root@puppetmaster-np local_modules]# tree pl_webapp1
pl_webapp1
  files
    context.xml
    deploy_webapp1
    ehcache.xml
    server.xml
    tomcat-webapp1
    tomcat-users.xml
  manifests
    init.pp
    install.pp
  templates
    pl.properties.erb

3 directories, 9 files
Profiles
A profile defines a bundle of modules that are related, describing components which are commonly installed together. For example, a ‘tomcat’ profile may include modules for java, tomcat and jsvc.
Note: The word ‘bundle’ is appropriate in most cases, however a profile can just as easily reference a single module. Bear in mind that profiles are logical groupings, which is quite different from a module’s functional purpose.
Implementation
All profiles are defined in a single ‘profile’ class, which is just another Puppet module. The profiles themselves are subclasses of the profile class. For example:
- profile::tomcat
- profile::base
- profile::webapp1
Note: There’s no need to create an init.pp for the profile module as class { profile: } should never be called on its own.
Here’s an example of the ‘tomcat’ profile:
#
# = Profile: tomcat
#
# Manages tomcat and associated software.
#
class profile::tomcat {
  include ::pl_java
  include ::pl_commons_daemon
  include ::pl_tomcat
}
Roles
Roles are simple top-level descriptions of host function. This is how a server would be referred to in everyday conversation. Some examples of roles:
- gitrepo
- puppetmaster
- dev-webapp1
A role definition is responsible for grouping together the necessary profiles, along with any role-specific configuration, which defines a particular type of server. The entire server configuration is encapsulated in this simple logical structure. The goal is to be able to provision a server from scratch just by informing the puppet agent of the server’s role.
Note: A single node should only have one role. If you need to create a multi-purpose host, you should define a profile class for each function, then create a new role and include the list of profiles.
Implementation
The role is defined via a custom facter fact called ‘role’. This can be found in /etc/puppetlabs/facter/facts.d/role.yaml. For example:
role: webapp1-dev-webappRoles are then described using a Hiera data source under the ‘role’ directory.
To do this, we need to revise our Hiera hierarchy:
---
backends:
  - yaml
hierarchy:
  - node/%{::fqdn}
  - "%{::environment}/%{::role}"
  - role/%{::role}
  - environment/%{::environment}
  - global
yaml:
  datadir: /etc/puppetlabs/puppet/hiera
This Hiera configuration provides a huge amount of flexibility. In addition to our existing functionality, it allows us to:
- Define a role for each node.
- Override a role definition on a per-environment basis.
For example, if we create a new node called ‘webserver1’ with the role ‘web’ and environment ‘uat’, Hiera will search for Puppet module parameters in the following files:
- /etc/puppetlabs/puppet/hiera/node/webserver1.yaml
- /etc/puppetlabs/puppet/hiera/uat/web.yaml
- /etc/puppetlabs/puppet/hiera/role/web.yaml
- /etc/puppetlabs/puppet/hiera/environment/uat.yaml
- /etc/puppetlabs/puppet/hiera/global.yaml
So that’s hierarchical configuration data for:
- This particular node
- All UAT web servers
- All web servers
- All nodes in UAT
- All nodes
Here’s an example of the webapp1-dev-webapp role in datadir/role/webapp1-dev-webapp.yaml. Note that it simply includes the appropriate profiles, then adds some role-specific configuration:
#
# = Role: dev-webapp1
#
# Hiera configuration data for the 'dev-webapp1' server role.
#
#-----------------------------------------------------------------------
classes:
  - profile::base
  - profile::tomcat
  - profile::webapp1

#
# Define our software versions
#
pl_tomcat::tc_version: 7.0.47-1
pl_tomcat::tc_native_version: 1.1.29-1
pl_java::version: oracle7u45

#
# Tomcat $CATALINA_BASE setup
#
pl_tomcat::catalina_base:
  webapp1-dev:
    basedir: /usr/local/tomcat-webapp1
    fileowner: webapp1

#
# Which version of the application to install
#
pl_webapp1::install::version: 6.3.0

#
# Which "target platform" identifier to put in /etc/pl.properties
#
pl_webapp1::target_platform: dev

#
# The tomcat http connector is listening on port 8080
#
pl_firewall::pre:
  000_accept_http:
    proto: tcp
    port: 8080
    action: accept

#
# Required NFS Mounts
#
pl_mounts:
  '/home':
    device: 'nfs2-d1:/vol/home'
    fstype: nfs
    ensure: mounted
    options: 'nfsvers=3,tcp,hard,bg,intr,rsize=32768,wsize=32768,timeo=600'
    atboot: true
    remounts: false
Visualisation
This diagram shows the relationship between Modules, Roles and Profiles:
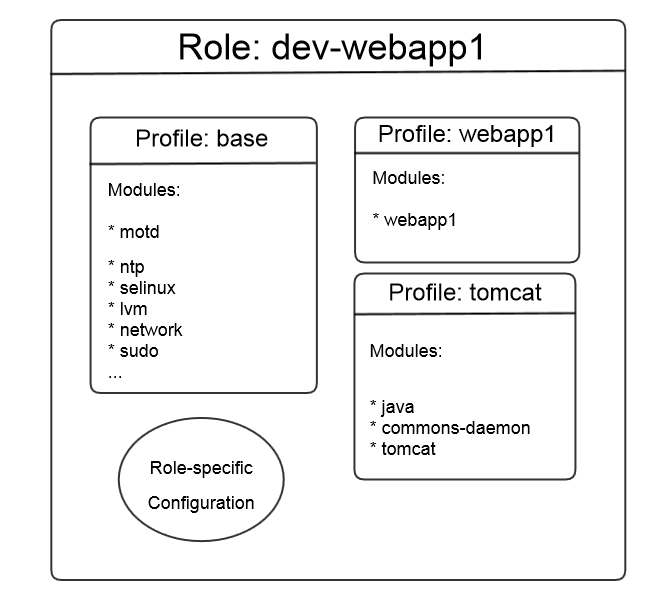
As illustrated, the ‘dev-webapp1’ Role is made up of three profiles:
- Profile: base
The base profile configures the standard OS packages (ntp, selinux, motd etc.) by including the modules responsible for installing and configuring these packages.
- Profile: tomcat
This profile includes the java, commons-daemon and tomcat modules
- i.e. everything you need to run a tomcat server, in addition to the base OS.
- Profile: webapp1
And this is our web application. In this case, there’s a single module called ‘webapp1’ which takes care of installation and configuration of the application.
Any confguration specific to the role is also included in the role’s Hiera data.
Summary
When a host is provisioned, we give the Puppet agent a custom facter fact called ‘role’. This role (along with any other host- or environment- specific configuration data) is sufficient to enable the Puppet Master to build a suitable catalog so that the agent can configure the node for the desired purpose.
In practice, it means we can auto-provision, say, a webapp1 development server in about 7 minutes.
Impressive!